Friday

LAYING DOWN THE BASE LAYER

If this is your first visit to my blog, you may want to begin reading the blog post titled "A BRIEF INTRO" and then follow with subsequent postings.
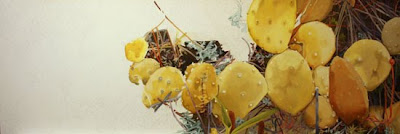
WHOOOPS! I left out a few steps here. This painting is 20" x 60". It's obvious that I will have to include some close-ups as I progress. I started in the brown background area in the center of the painting, and I found myself getting lost in the detail, and seriously bogged down. I decided that I would start painting the large yellow shapes to remedy this problem. I regained my momentum and was able to get back in touch with my original feeling/impetus for the painting. The smaller imagery in the darker background is pretty bright but, I will be using glazes when I refine things in the second layer. I've made some color decisions that I feel happy with. I haven't decided yet if I will be using a sfumato or a sharp focus in the final layer. For the moment, it is pretty hard edged. I have also decided that I am going to add some medium sized elements to balance the large yellow shapes against the smaller shapes in the background. In the center of the painting, towards the bottom, I have over painted a beige brown to cover up a bad color decision. When I glaze this layer with a dark brown, some of that beige will show through the tooth of the painting, making it look like the other dark brown areas. Most of the linear, small elements are not showing much change in value or shift in shape but, that is okay to do in the base layer. Another decision was deciding which brushes to use for these narrow elements. I am using a synthetic brush that suprisingly is not pointed. I hate that they put points on all round brushes, no matter what the size. Pointed brushes leave a definite type of mark, usually the wrong mark. I am also using some black animal hair brushes without a back bone. They are so wimpy but, they are perfect for the job. Next post I will show some details.

Monday

STRETCHING AND APPLYING THE GESSO

If this is your first visit to my blog, you may want to begin reading the blog post titled "A BRIEF INTRO" and then follow with subsequent postings.

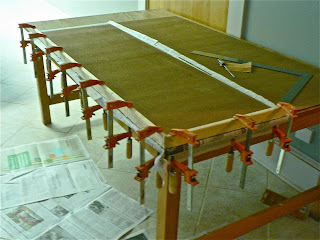
"Stretching the canvas" is a two person job. Much thanks to Cody for helping me out with this chore. The canvas was stapled to the back of the lumber 1 x 2's. I manned the canvas pliers while Cody stapled, making sure that the canvas is wrapped very tightly. We worked from the middle out constantly rotating the stretcher. Then the gesso, which is a thick priming type material, was applied in two thick coats with time for drying in between. Then the canvas is sanded lightly to a smooth finish.

BUILDING THE SUPPORT- Step 4

If this is your first visit to my blog, you may want to begin reading the blog post titled "A BRIEF INTRO" and then follow with subsequent postings.

The support was coated with a water based sealer. A final coat of sealer is applied two hours later and allowed to dry over night.

BUILDING THE SUPPORT- Step 3

If this is your first visit to my blog, you may want to begin reading the blog post titled "A BRIEF INTRO" and then follow with subsequent postings.

The middle brace supports are carefully cut and then glued. After this step is completed, the lumber braces are nailed to each other, and then left to set for twenty-four hours

BUILDING THE SUPPORT-Step 2

If this is your first visit to my blog, you may want to begin reading the blog post titled "A BRIEF INTRO" and then follow with subsequent postings.

Twenty-four hours later Step 1 is repeated for the two remaining sides.

BUILDING THE SUPPORT- Step 1

If this is your first visit to my blog, you may want to begin reading the blog post titled " A BRIEF INTRO" and then follow with subsequent postings.

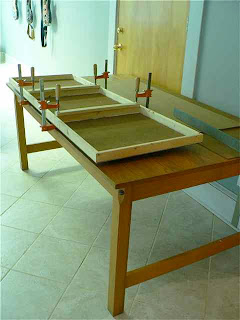
I chose an unusual format for this painting, 20" x 60", and I wanted to paint on canvas stretched on a fiberboard support. This meant that I had to build it myself since buying it made, would be cost prohibitive. The fiberboard is untempered so oils will not leach into the canvas. The 1 x 2 lumber was cut to fit the four outer sides. I used a very strong glue and to quote David, "One can never be too rich, too thin, or use too many clamps". I could only glue two sides of the support at a time. I did not use nails to fasten the lumber to the fiberboard because, they would have worked their way out over time. Then I let it sit for twenty-four hours.

EVOLUTION OF THE "IDEA"

If this is your first visit to my blog, you may want to begin reading the blog post titled "A BRIEF INTRO" and then follow with subsequent postings.

At this point you might think I am ready to begin but, experience has taught me that would be a big mistake. The "Idea" must always be taken beyond its first impulse. The next steps involve a layering of secondary ideas, , examining a range of possibilities from the source idea, planning, drawing out roughs, mapping out the structure of the painting, and troubleshooting. Little pieces of paper gradually pile up and are added to the notebook.
It was at this stage that I realized that I could, to some degree, meld the same composition I used in my still lifes into the landscape, which is something I have been seeking for a long time. I could also borrow my sense of color from the still lifes as well.

THE IDEA

If this is your first visit to my blog, you may want to begin reading the blog post titled " A BRIEF INTRO" and then follow with subsequent postings.

Long before the paint hits the canvas, an idea or concept must take hold of me. It's really hard to explain how this happens or what it feels like but, I will try. It's almost like a fifth sense; a glimpse into the future that leaves a deep seated impression. It's almost like a taste in your mouth, a feeling on which, for the duration of the painting, I must maintain an unclouded hold. It's something akin to the way a writer surrenders control of the telling of the story to the characters which inhabit the book. You have to be the vehicle for the painting to paint itself.
To begin, I have always felt that the landscape that an artist is usually inspired by is the landscape of their youth. I grew on the northern coast. I identified with the ocean, its marshes, its bridges, its steep craggy cliffs, and the sweeping vistas it afforded. There were many old farmsteads on austere hills and mysterious forests. More importantly, this area gave me that feeling of "oldness"; of being tied to a long ago past. When I moved to Atlanta, everything seemed "newish". I did not get that tie to the past. Also, although Atlanta is in a comparatively healthy ecosystem, this thriving temperate forest did not allow for much of a vista. I had a teacher who once described the landscape here as if you were "living in an egg". The green around you is so all encompassing, it's rare to look up to a spacious sky or out to an expanse of land, due to the hills and the towering greenery. Perhaps the reason for so many great southern writers is that the landscape forces them to become introspective, to examine what is close because they cannot examine what is far.
Although I was pleased with my landscape painting, for the most part I did not really identify with the subject matter. Still, I could not stop myself from painting it because, I am so drawn to nature. It's just so beautiful. I am hopelessly in love with it.
So, that's the back story, and a photo of where I came upon my "idea" which, as you now know, was more that just an idea.

A BRIEF INTRO

My aspiration for this blog is to explain the painting process. However, I want you to know that even though I work in the studio almost every day, I will not be working only on this painting. I usually have several things that I work on at one time. I've just wrapped up a large still life painting, which has stalled my work on this new series. Between the once a week figure painting, contemporary still lifes, plein air painting, small studies, and larger landscapes done in the studio, I stay pretty busy. So, "The Painter's Progress" is not giving you the full picture of all that I do but, it will give you a better understanding of what an individual painting entails.
If you wish to see some of these different genres of painting that I do, please check out my website at:
www.nancyhunterart.com.