 If this is your first visit to my blog, you may want to begin reading the blog post titled "A BRIEF INTRO" and then follow with subsequent postings.
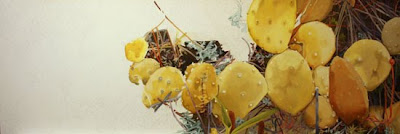
WHOOOPS! I left out a few steps here. This painting is 20" x 60". It's obvious that I will have to include some close-ups as I progress. I started in the brown background area in the center of the painting, and I found myself getting lost in the detail, and seriously bogged down. I decided that I would start painting the large yellow shapes to remedy this problem. I regained my momentum and was able to get back in touch with my original feeling/impetus for the painting. The smaller imagery in the darker background is pretty bright but, I will be using glazes when I refine things in the second layer. I've made some color decisions that I feel happy with. I haven't decided yet if I will be using a sfumato or a sharp focus in the final layer. For the moment, it is pretty hard edged. I have also decided that I am going to add some medium sized elements to balance the large yellow shapes against the smaller shapes in the background. In the center of the painting, towards the bottom, I have over painted a beige brown to cover up a bad color decision. When I glaze this layer with a dark brown, some of that beige will show through the tooth of the painting, making it look like the other dark brown areas. Most of the linear, small elements are not showing much change in value or shift in shape but, that is okay to do in the base layer. Another decision was deciding which brushes to use for these narrow elements. I am using a synthetic brush that suprisingly is not pointed. I hate that they put points on all round brushes, no matter what the size. Pointed brushes leave a definite type of mark, usually the wrong mark. I am also using some black animal hair brushes without a back bone. They are so wimpy but, they are perfect for the job. Next post I will show some details.